How to Power Arduino with 18650 Batteries
In this guide, we’ll show you exactly how to use two 18650 lithium-ion batteries to safely power an Arduino Uno, using a simple setup with visual demonstration.
Why Use 18650 Batteries for Arduino?
18650 batteries are rechargeable, high-capacity (often 6800mAh or more), and deliver a nominal voltage of 3.7V. When used in series, two 18650s provide approximately 7.4V — perfect for powering an Arduino board through its VIN pin.
What You’ll Need
- 2 × 18650 3.7V lithium-ion batteries (e.g., 6800mAh)
- 18650 battery holder (2-slot)
- Arduino Uno (or compatible board)
- Breadboard (optional)
- Jumper wires (optional)
- LED and 220Ω resistor (for test circuit, optional)
Wiring Diagram and Setup

In your setup:
- Insert the two 18650 batteries into the holder.
- Connect:
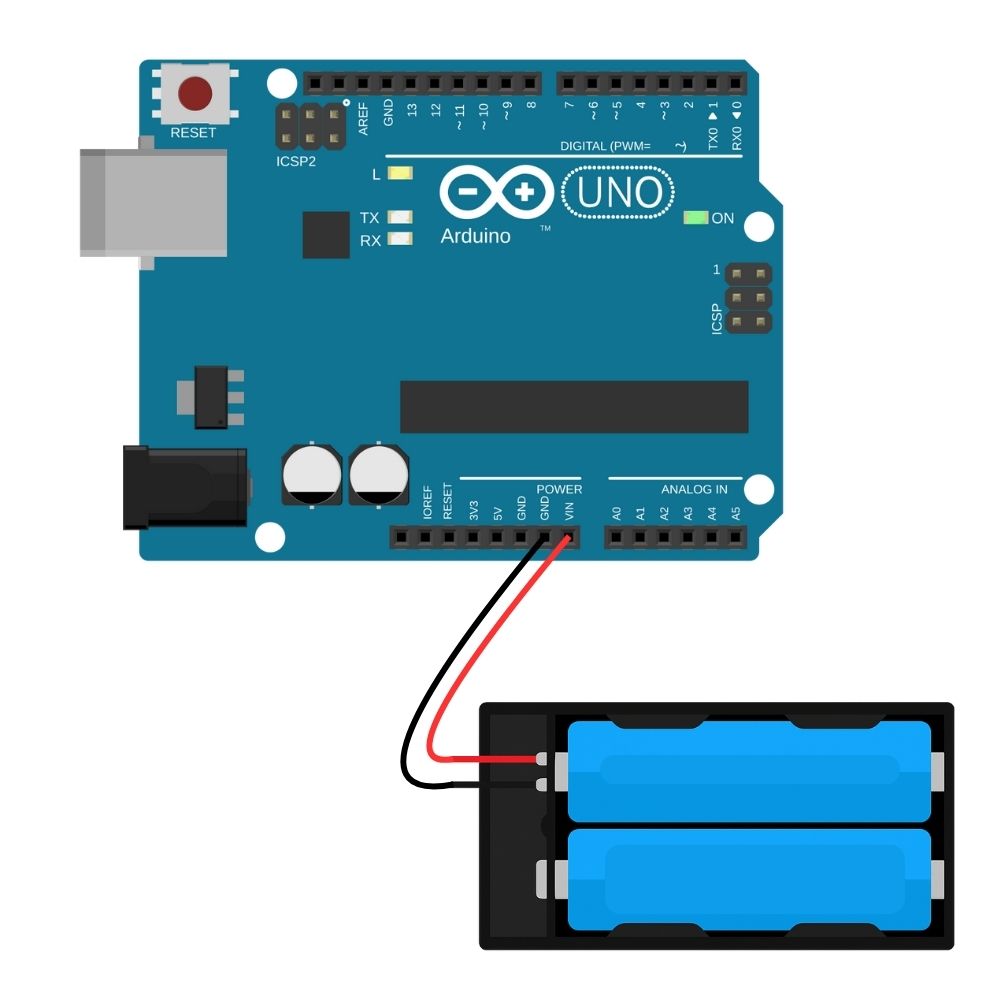
- Red wire (positive) from the battery holder to the VIN pin on the Arduino.
- Black wire (negative) from the battery holder to the GND pin on the Arduino.
- The Arduino will now receive around 7.4V and regulate it internally to 5V.
- (Optional) Test with an LED connected on a breadboard to pin 13 or any digital pin.
As shown in the image above, this setup powers the Arduino and lights up a green LED connected to a breadboard.
Important Safety Tips
- Always use a battery holder — never solder directly onto 18650 batteries.
- Ensure the batteries are connected in series, not parallel.
- Avoid overcharging or over-discharging — use protected 18650 batteries if possible.
- Do not connect the batteries directly to the 5V pin — it bypasses the onboard voltage regulator and could damage your Arduino.
Advantages of Using 18650 Batteries
- High capacity for long-lasting power
- Rechargeable and reusable
- Ideal for outdoor, wireless, or robotic Arduino projects
Conclusion
Powering your Arduino with 18650 batteries is a simple, effective way to make your projects mobile and energy efficient. With just two 18650 cells and a basic holder, you can achieve a clean, reliable power supply anywhere.
Comments (0)
No comments yet. Be the first to comment!
Leave a Comment