How to Connect ESP32 with ThingsBoard
Learn how to connect an ESP32 board to ThingsBoard Cloud in under 15 minutes. Full code example, screenshots included.
1. Why pair ESP32 with ThingsBoard?
The ESP32 is a dual-core Wi-Fi/BLE micro-controller that costs only a few dollars, yet packs enough horsepower to run complex IoT workloads. ThingsBoard—an open-source IoT platform available as a managed EU Cloud—adds device management, dashboards, rule-engine automation and robust MQTT support.
Combining both gives you:
- Rapid prototyping – flash code once, watch data appear instantly.
- Scalable telemetry storage – ThingsBoard handles millions of datapoints.
- Low latency control – two-way MQTT lets you push RPC commands to the board in real time.
- Future-proof integrations – connect to AWS, Azure, Kafka, or PostgreSQL with a few clicks.
2. Prerequisites & hardware list
| Item | Minimum spec | Why you need it |
|---|---|---|
| ESP32 dev kit | Any ESP32 works | Built-in USB-UART, 30 GPIOs |
| Micro-USB cable | Data-capable | Flash & power |
| Wi-Fi network | 2.4 GHz, open or WPA2 | ESP32 can’t join 5 GHz |
| ThingsBoard Cloud account | Free Maker tier is fine | Provides MQTT broker & dashboards |
| Arduino IDE 2.3+ | Board support v2.0.15+ | Modern serial monitor & JSON preview |
| Internet Connection | 4Mbps | Get access token from ThingsBoard |
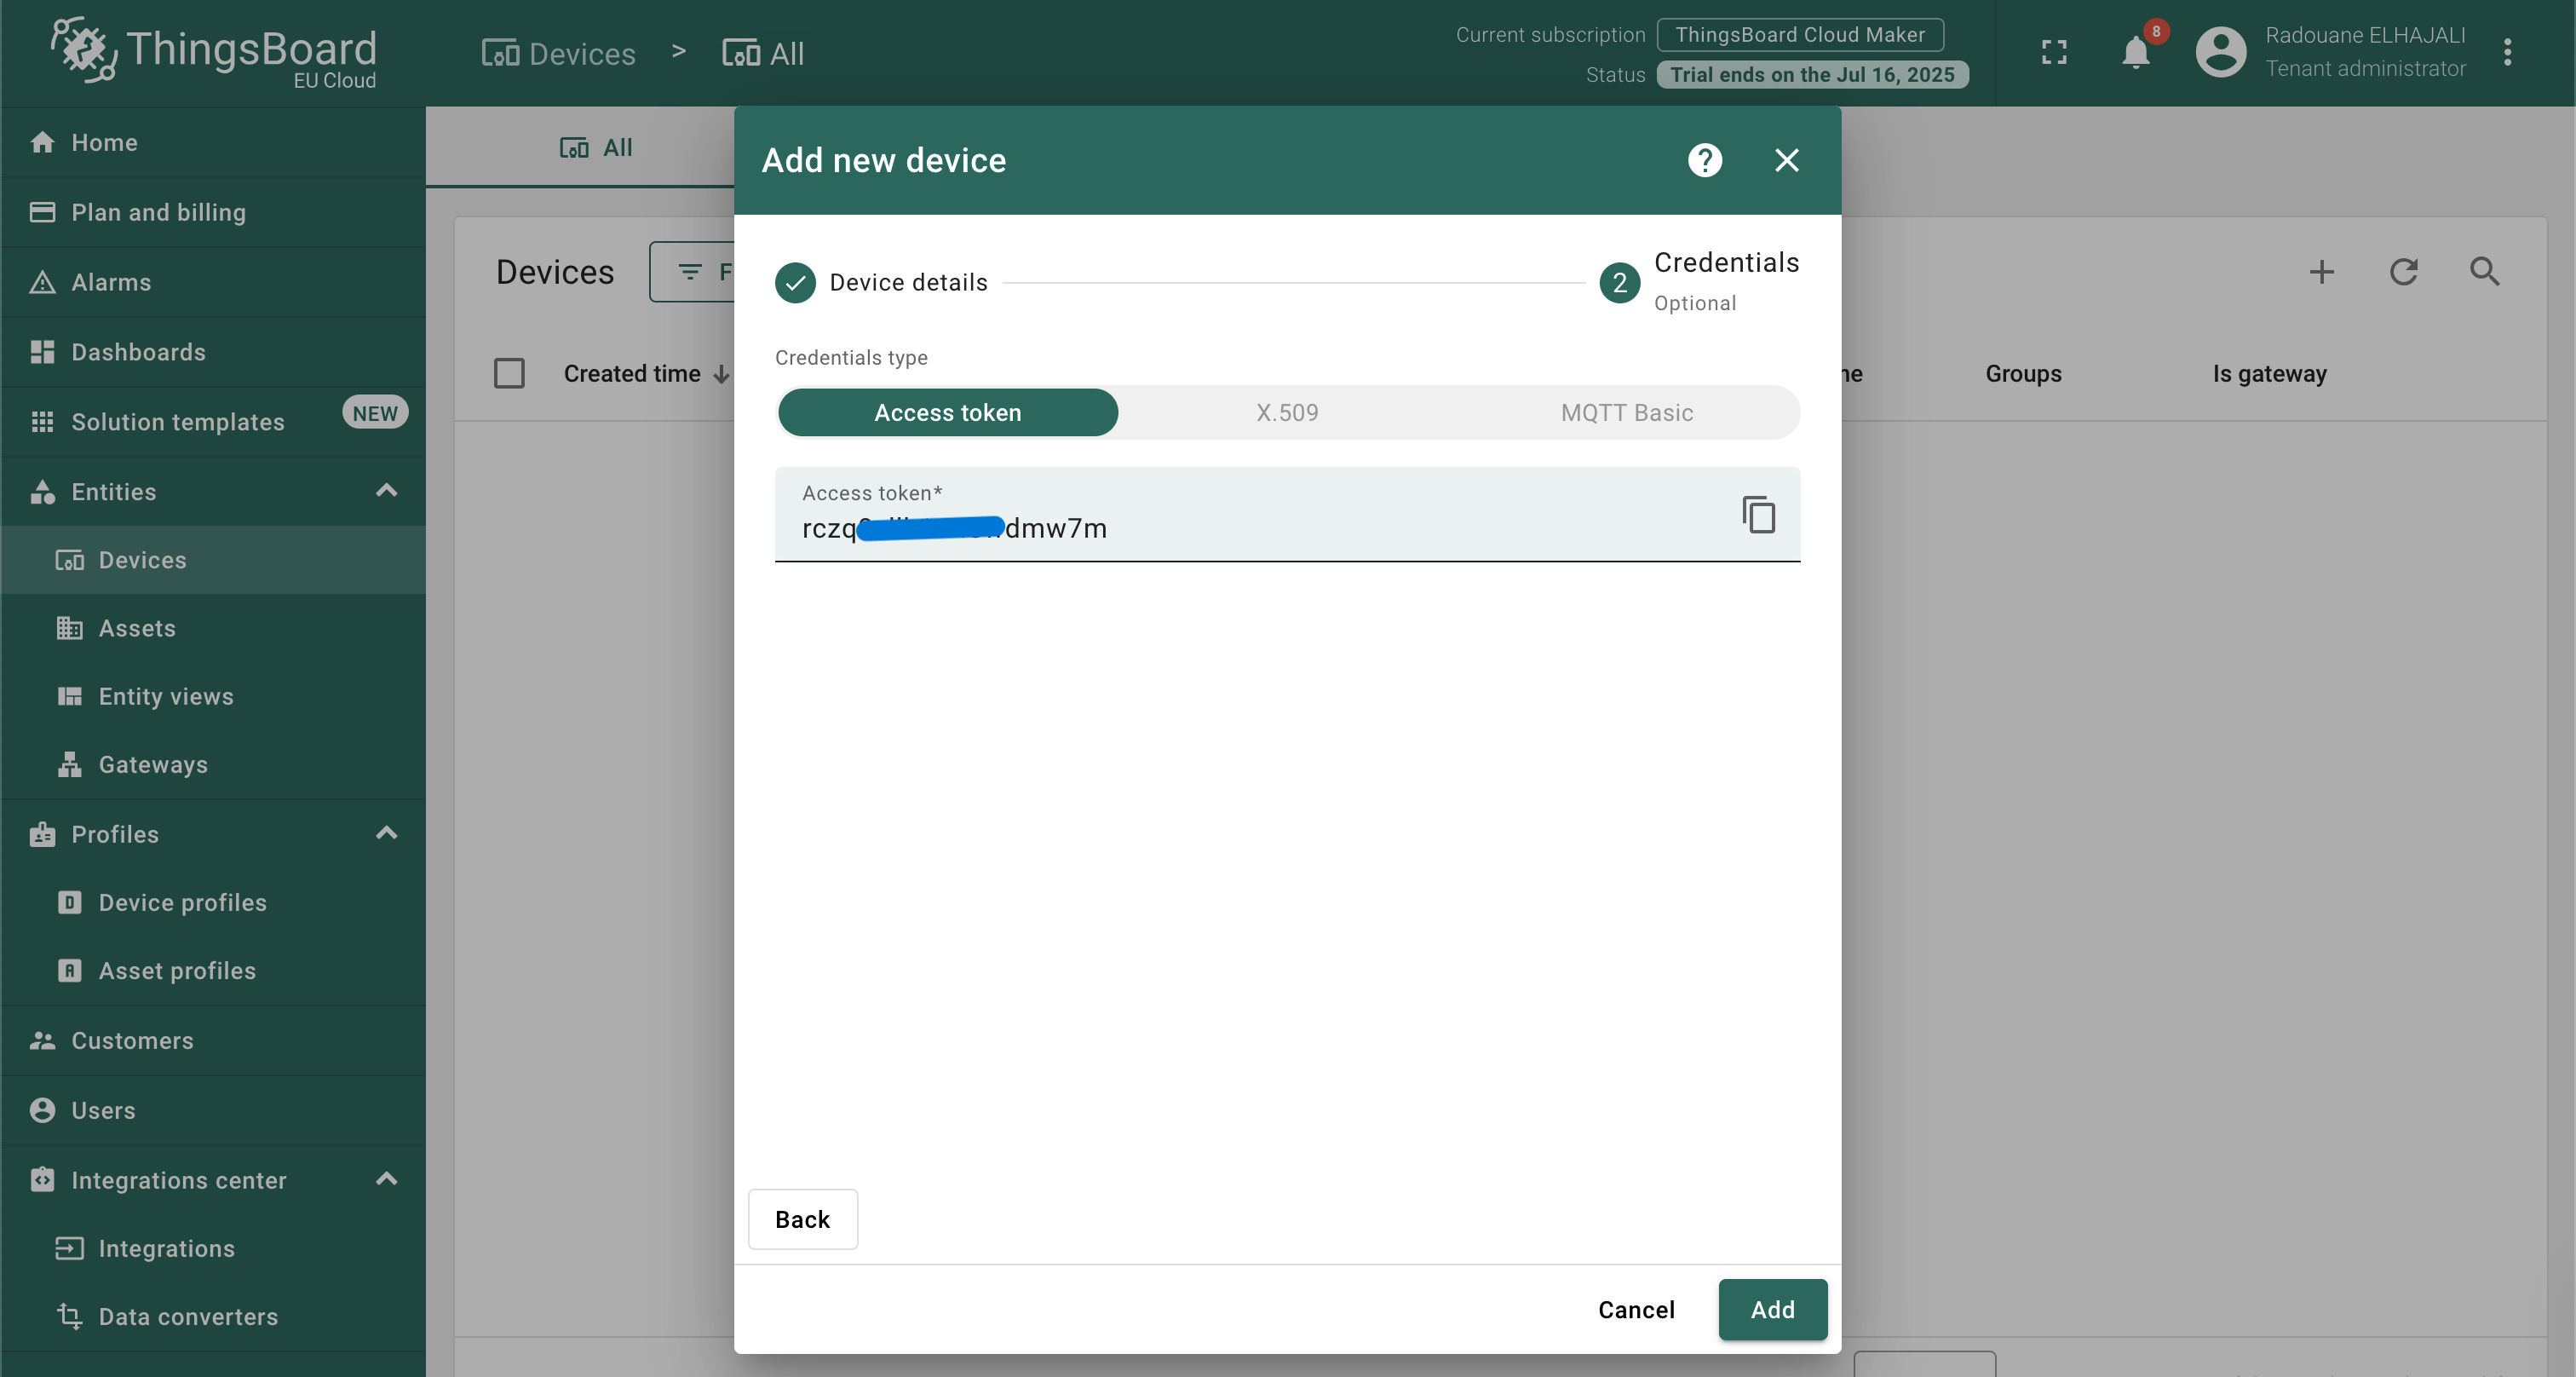
3. Create a new Device on ThingsBoard
- Log in to eu.thingsboard.cloud and open Entities → Devices.
- Press the “+” icon → Add new device.
- Enter a Name (e.g.,
SOSLab) and hit Next: Credentials. - Keep Access token selected, then copy the auto-generated token (e.g.,
rczq0zIl*****5wdmw7m). - Click Add. The device state should flip to Active once the ESP32 connects.
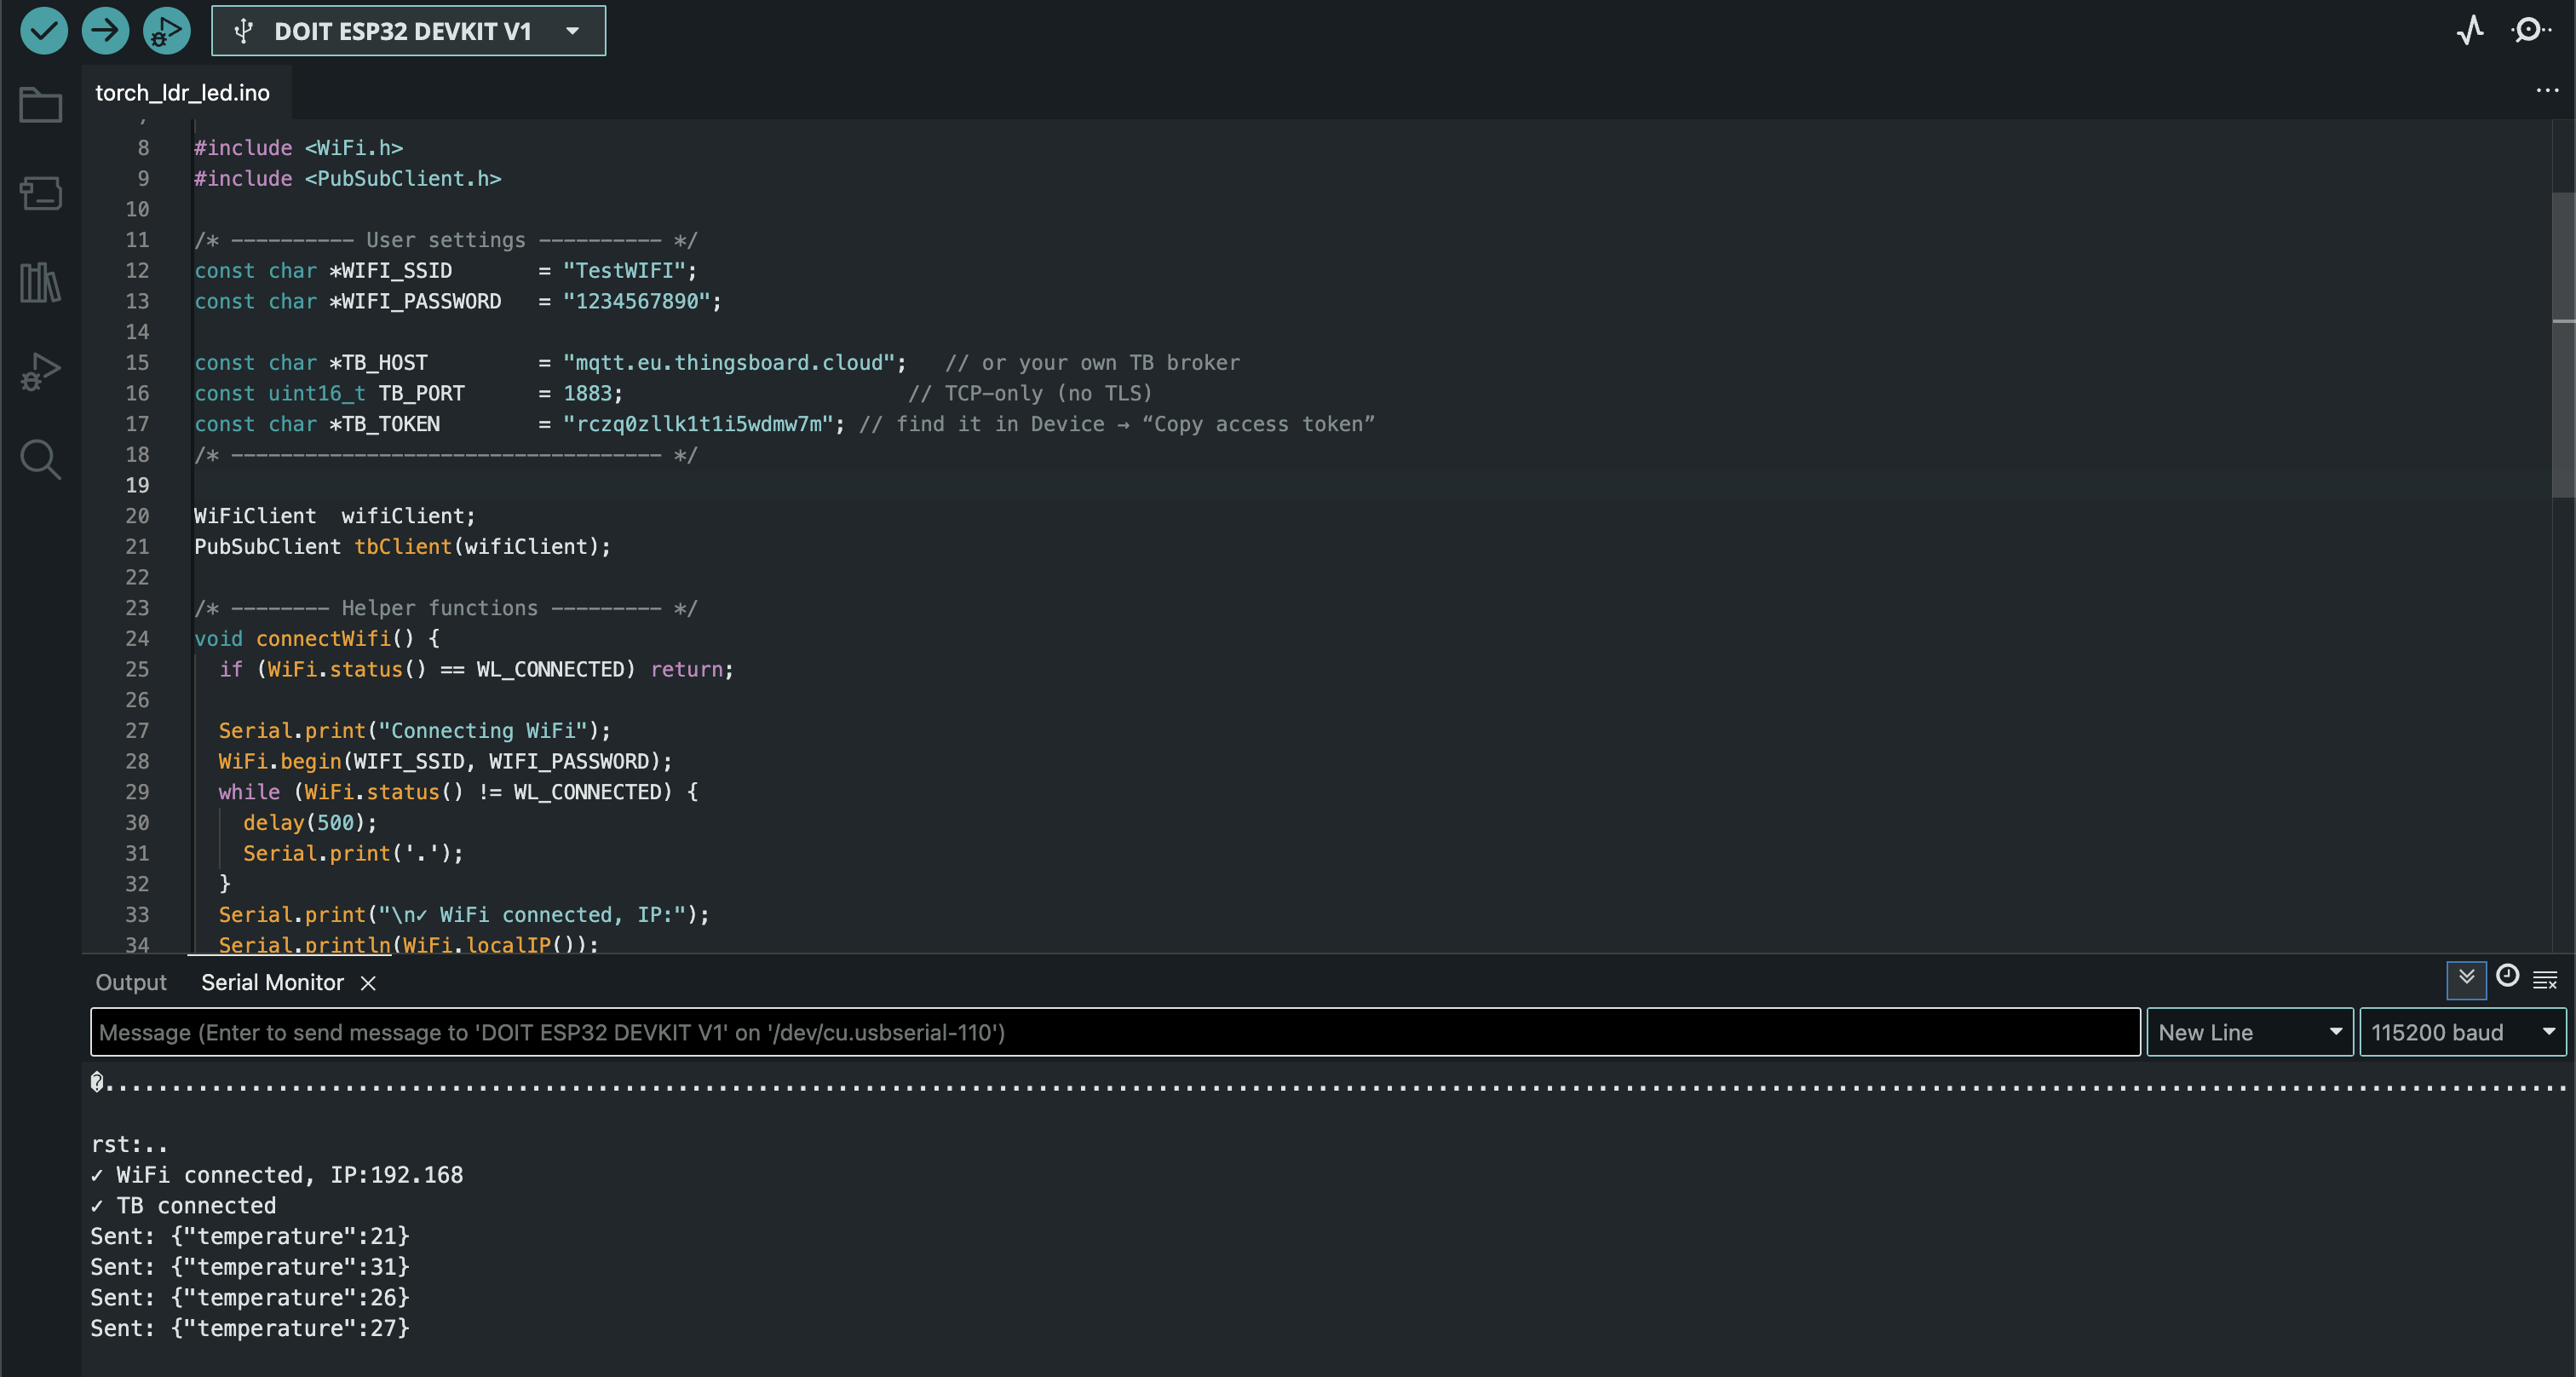
4. Flash your ESP32 with the access-token sketch
#include <WiFi.h>
#include <PubSubClient.h>

/* ======== User settings ======== */
const char *WIFI_SSID   = "TestWIFI";
const char *WIFI_PASS   = "1234567890";

const char *TB_HOST     = "mqtt.eu.thingsboard.cloud";
const uint16_t TB_PORT  = 1883;                 // plaintext MQTT
const char *TB_TOKEN    = "rczq0zIl******5wdmw7m";
/* ================================= */

WiFiClient  wifiClient;
PubSubClient tbClient(wifiClient);

void connectWiFi() {
  if (WiFi.status() == WL_CONNECTED) return;
  WiFi.begin(WIFI_SSID, WIFI_PASS);
  while (WiFi.status() != WL_CONNECTED) delay(500);
}

void connectTB() {
  while (!tbClient.connected()) {
    tbClient.connect("ESP32", TB_TOKEN, nullptr); // user = "", pass = token
  }
}

void setup() {
  Serial.begin(115200);
  WiFi.mode(WIFI_STA);
  tbClient.setServer(TB_HOST, TB_PORT);
}

void loop() {
  connectWiFi();
  connectTB();
  tbClient.loop();

  static uint32_t t0;
  if (millis() - t0 > 5000) {           // every 5 s
    t0 = millis();
    String payload = "{\"temperature\":" + String(random(20, 35)) + "}";
    tbClient.publish("v1/devices/me/telemetry", payload.c_str());
    Serial.println("Sent: " + payload);
  }
}
Upload tips
- Select Board > ESP32 Arduino > DOIT ESP32 DEVKIT V1.
- Choose 115200 baud for a clean serial log.
- If flashing fails, press BOOT on the module while IDE prints
Connecting......
5. Verify real-time telemetry
- Back in ThingsBoard, click your device name → Latest telemetry tab.
- You should see keys like temperature = 28 with timestamps updating every few seconds.
- Build a quick chart: Dashboards → Create new dashboard → Add widget → Timeseries Line Chart. Select your device and the
temperaturekey.
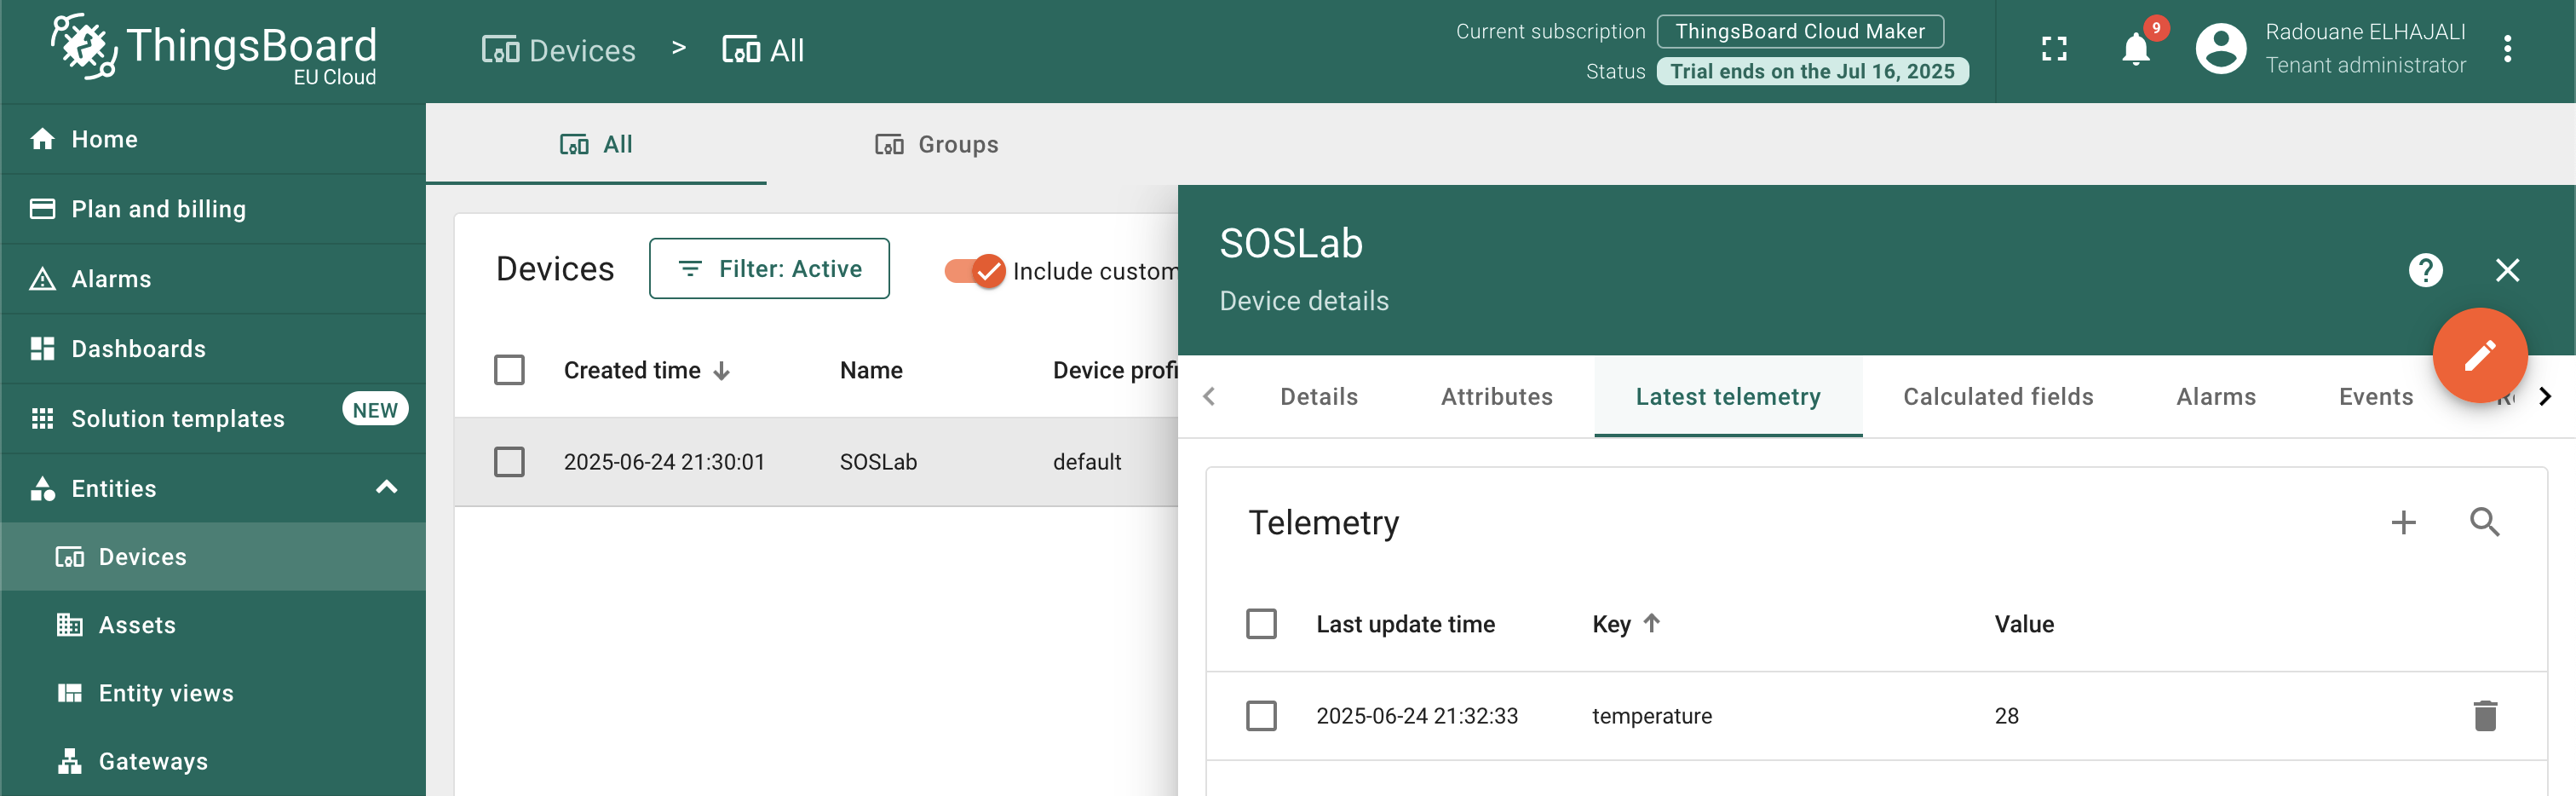
Did the values appear? Congratulations—you’ve successfuly connected your ESP32 with ThingsBoard.
6. Troubleshooting common errors
| Serial Monitor error | Likely cause | Quick fix |
|---|---|---|
MQTT connect failed, error = -2 | Wrong host or port | Use mqtt.eu.thingsboard.cloud, port 1883 |
Connection Refused: not authorised | Token typo / device disabled | Regenerate token under Credentials |
| ESP32 reboots endlessly | Power brown-out | Use a 5 V > 500 mA supply, not USB-hub |
| Values stop after a minute | Forgot tbClient.loop() | Ensure it’s called each loop() cycle |
7. Scaling beyond a single board
- Multiple sensors: Create unique devices or reuse the same token for a small fleet (<10) if security is less stringent.
- Rule Engine: Forward telemetry to email, Slack, or a database when thresholds trigger.
- OTA Updates: Use Firmware tab to push
.binbuilds over MQTT—no physical access required. - Edge deployments: ThingsBoard Edge syncs data offline and uploads when connectivity returns, perfect for farms or factories.
8. Conclusion & next steps
You’ve just completed a production-grade, yet beginner-friendly walkthrough on how to connect ESP32 with ThingsBoard. We:
- Registered a new device and grabbed its access token.
- Flashed the ESP32 with a minimal Arduino MQTT sketch.
- Confirmed live telemetry on a ThingsBoard dashboard.
What’s next?
- Add more telemetry keys—humidity, voltage, GPS.
- Enable RPC to toggle GPIOs from the cloud UI.
- Explore ThingsBoard Integrations to send data to AWS IoT Core or Node-RED.
Comments (0)
No comments yet. Be the first to comment!
Leave a Comment