Connecting a DHT11 Temperature & Humidity Sensor to Your Raspberry Pi 5
Introduction
Monitoring environmental conditions like temperature and humidity is essential for home automation, weather stations, and many IoT applications. In this tutorial, we’ll walk through how to connect a DHT11 sensor to the Raspberry Pi 5, read data in Python, and resolve a common Blinka/GPIO compatibility error.
Why the DHT11?
- Affordable and widely available
- Simple digital interface (one-wire)
- Suitable for basic temperature (±2 °C) and humidity (±5 %) monitoring
Prerequisites
- Raspberry Pi 5 running Raspberry Pi OS
- Python 3 installed
- A DHT11 sensor or module
- Jumper wires and optional 4.7 kΩ–10 kΩ pull-up resistor
- Basic familiarity with the terminal and Python
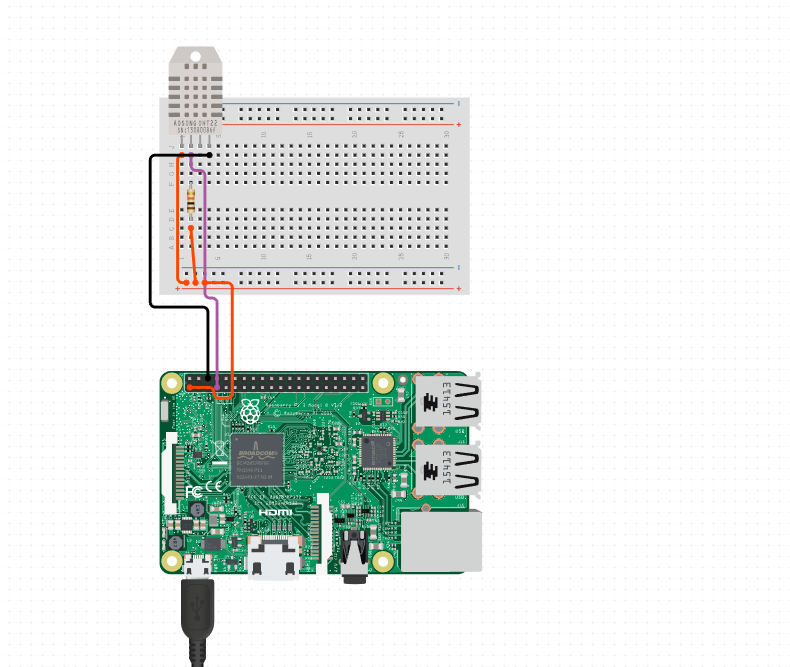
Hardware Setup
- Power & Ground
- VCC → Pi Pin 1 (3.3 V)
- GND → Pi Pin 6 (GND)
- Data Line
- DATA → Pi Pin 7 (GPIO4)
- Pull‑up Resistor
- If your module lacks a built‑in resistor, solder or wire a 4.7 kΩ–10 kΩ resistor between DATA and VCC.

2. Software Installation
We’ll use the Adafruit Blinka library (CircuitPython compatibility) and the CircuitPython DHT driver.
# Update OS packages
sudo apt update && sudo apt upgrade -y

# Install system dependencies
sudo apt install python3-pip python3-dev -y

# (Option A) System‑wide GPIO shim for Pi 5
sudo apt install python3-rpi-lgpio -y
sudo adduser $USER gpio

# Activate your project venv
python3 -m venv .venv && source .venv/bin/activate

# Install Python packages in venv
pip install adafruit-circuitpython-dht adafruit-blinka
Note: If you prefer to keep everything inside your virtual environment, simply skip the system install of python3-rpi-lgpio and instead run:
pip uninstall RPi.GPIO
pip install rpi-lgpio
3. Python Code
Create a file named main.py:
import time
import board
import adafruit_dht
# Configure sensor type and pin
DHT_SENSOR = adafruit_dht.DHT11(board.D4)
while True:
   try:
       temp_c = DHT_SENSOR.temperature
       humidity = DHT_SENSOR.humidity
       print(f"Temperature: {temp_c:.1f} °C  Humidity: {humidity:.1f}%")
   except RuntimeError as e:
       # Reading fails early on; retry
       print(f"Read error: {e}")
   time.sleep(2)
4. Troubleshooting
ModuleNotFoundError: No module named 'lgpio'- Ensure you installed
python3-rpi-lgpiosystem‑wide, or inside your venv installrpi-lgpio. - Confirm that Blinka sees the shim by running
python -c "import lgpio; print(lgpio.__name__)".
- Ensure you installed
- Permission denied on GPIO
Make sure your user is in the
gpiogroup:sudo adduser $USER gpio- Log out & back in.
- Intermittent reads or
Nonevalues- Check your pull‑up resistor and wiring.
- Increase the
time.sleep()interval if needed.
5. Conclusion
Now you have a fully functional DHT11 sensor on your Raspberry Pi 5, reporting live temperature and humidity in Python. From here, you can integrate readings into dashboards, log to CSV or JSON, or drive automation based on environmental thresholds. Happy hacking!
Comments (0)
No comments yet. Be the first to comment!
Leave a Comment